About Me

My photo
Former teacher, clinical social worker and now entrepreneur. My focus, no matter what career I am engaged in, has been on helping people. Now I am on an incredible journey to change life in a leaner, cleaner, greener way. I hope you will join me in this transition.
Showing posts with label natural products. Show all posts

Sunday, July 21, 2013

Go Bananas and Get Rid of Your Wrinkles


Image from www.PositiveMed.com
This article from PositiveMed.com describes simple natural recipes to combat the dreaded wrinkle!!  For instance, did you know that bananas and banana peels have been used for centuries to help many skin conditions, including acne, wrinkles, warts, psoriasis and poison ivy?  Neither did I!!  But here are some easy natural remedies for wrinkles!!

1. Mash a banana until it has a creamy texture and apply it to your entire face for 30 minutes, bananas have so much more going for them than just a delicious and nutritious treat.

 2. Coconut oil is the best option when it comes to natural wrinkle removal, since it rebuilds our skin tissue and will also leave your face skin moisturized and feeling smooth and beautiful.

 3. Pineapple juice can easily rival any treatment, in fact it is much better, because they are packed with the enzyme bromelain which naturally eats away our top layer of skin when applied topically and leaves the new fresh skin underneath.

Monday, July 8, 2013

Super Simple Homemade Grout Cleaner ... It Works!!


I wasn't sure this grout cleaner would work because it was so simple to make with ingredients I had on hand in my pantry ... but it worked like a CHARM!!!  No more expensive grout cleaners for me!!!
7 cups water, 1/2 cup baking soda, 1/3 cup lemon juice and 1/4 cup vinegar - throw in a spray bottle and spray your floor, let it sit for a minute or two... then scrub.

Tuesday, April 30, 2013

Home Made Cat Treats

Panda and Goofy
Several times this past year I have opened the paper to learn that some pet food has been recalled.  I am really nervous about what I should be feeding my furry little family. 

I saw this recipe for home made tuna treats on All Things Homemade.  It doesn't look to difficult, so I think I am going to try it.

Tuna Cat Treats
Ingredients:
1/2 cup of whole-wheat flour
1/2 cup of powdered milk
1/2 cup of tuna packed in oil
... 1 large beaten egg
1/4 cup of water

Preheat oven to 350 degrees. Grease a cookie sheet or line with parchment paper. In a bowl, mix tuna and egg together making sure to break up the tuna really well. Next stir in the dry ingredients and add the water in a little at a time until you achieve a sticky dough ball. Break dough ball up into smaller bite sized balls and place on cookie sheet approximately 1 inch apart. Cook at 350 degrees for 25 minutes. Let cool completely before serving to your pet.

Monday, April 29, 2013

Virgin Coconut Oil Uses and Benefits


Virgin Coconut Oil has really come on to my radar lately so I checked out The Coconut Oil Tips Web Site to learn more ways to use this great natural product. 

Virgin Coconut Oil General Health Benefits
1. Antioxidant
2. Antiviral
3. Antibacterial
4. Antifungal
5. Boosts metabolism, burns quickly
6. Immune support
7. Improves mineral absorption (calcium and the ever-important magnesium)


 Coconut Oil Uses for Beauty
1. Cuticle oil — Softens and strengthens cuticles, and soothes/prevents hangnails.

2. Eye makeup remover — Use it to remove makeup, even waterproof mascara.

3. Wrinkle buster — Reduces the appearance of fine lines and wrinkles.
4. Defrizzer. Use to defrizz and smooth fly-aways. Works especially well on dark hair.

5. Deep conditioner – Coconut oil works extremely well as a conditioning treatment, especially as a pre-shampoo hair repair mask.

6. Natural deodorant — You can dab some under your arms plain, or mix it with baking soda.

7. Toothpaste — Use it as an ingredient, with baking soda, for homemade toothpaste. Good for gum health.

8. Sunscreen (SPF) — It doesn’t sound like it, but coconut oil has an SPF of 4-6. And if you use it while tanning, it prevents skin damage due to its antioxidant and moisturizing properties.

9. Body scrub — Mix with a little sugar or sea salt for a yummy, moisturizing body scrub.

10. Lip balm — Hydrating on dry or cracked lips. You can try mixing it with shea butter to make it richer.

11. Foot/Heel softener — Softens and smooths dry, cracked heels.

12. Facial cleanser — Massage in like any facial cleanser and rinse with a cloth. Some have reported that it works especially well if you rinse it off with tea tree oil. (Not sure about coconut oil for face?

13. Body butter –  Coconut oil is a great moisturizer by itself, but for even more pampering, whip it into a homemade body butter using a kitchen mixer.

14. Aftershave — Men can use this on their face, and for ladies it is amazingly soothing on legs and the bikini area.

15. Massage Oil — Just melt some down.

16. Elbows — Improves look of dry dark elbow patches.

17. Shaving “cream” – Just use it in the shower like you would with shave cream/gel, or apply it before shaving normally as a pre-shave preparation.

18. Hair growth

19. Bug repellant — Just mix with a few drops of peppermint oil and apply to skin.

20. Stretch mark oil — Use it on your pregnant belly to prevent stretch marks. It also works on stretch marks to reduce their appearance.

21. Bath oil — Add to your bath for a tropical and moisturizing pampering.

22. Fades age spots.

23. Mole removal — Use it after removing moles with the apple cider vinegar compress method.

24. Tattoos — Aids in healing a new tattoo, and regular use prevents the ink from fading.

25. Cellulite.

26. Hair dye help — Use on skin along hair dye to keep dye off during coloring process.

Coconut Oil Uses for Health

1. Keratosis Pilaris – Slather on a little bit of coconut oil after your shower while your skin is still damp, and over a couple of weeks it will drastically reduce the appearance of the little red bumps known as KP or “chicken skin”.

2. Herpes treatment – reduces viral loads in test subjects, use internally and externally.

3. Candida – reduces candida culture in the gut.

4. Dementia/Alzheimer’s – Because of its ketogenic diet benefits, coconut oil improves symptoms of Alzheimer’s.

5. Hypothyroidism – boosts metabolism, raises basal body temp.

6. Cold sores – can be applied topically to remove them.

7. Lice — Just slather some on the scalp under a shower cap for a few hours. A lot of people report success with this!

8. Detox.

9. Helps absorb vitamins and mineral supplements.

10. Scrapes and cuts ointment — Use coconut oil, which is antibacterial, topically to kill bacteria and heal the skin.

11. Athlete’s foot.

12. Nail fungus.

13. Pink eye.

14. Burn ointment — Like aloe vera, coconut oil has anti-inflammatory properties and is soothing.

15. Canker sores.

16. Gum disease/gingivitis — aids in gum health when used as toothpaste or rubbed on gums.

17. Asthma.

18. Autism.

19. Epilepsy — Coconut oil has been known to reduce epileptic seizures.

20. ADHD.

21. Breastfeeding discomfort — Sooth chaffed nipples from breastfeeding with coconut oil.

Coconut Oil Uses for Cooking

1. Cooking oil – Virgin coconut oil has a high smoke point, so it is less likely to degrade during cooking than other oils, and is more suitable for healthy cooking.

2. Butter substitute — Great substitute for baking, or just plain on toast!

3. Popcorn – Coconut oil has traditionally been used for movie theater popcorn and it’s just as tasty but much healthier if you use the extra virgin, unrefined kind! Just put a big spoonful in a pot, let it melt slightly then add the kernels on top for popping. Amazing!

4. Smoothies — Add 1 to 3 tablespoons of coconut oil to fruit smoothies and green smoothies for a subtle tropical flavor. This is my favorite way to get my daily fix and boost my energy, since it revs metabolism and also is known to help you absorb vitamins and nutrients.
Household Uses for Coconut Oil

1. Conditions wooden cutting boards.

2. Wood polish.

3. Furniture polish (mix with lemon juice).

Coconut Oil Uses for Baby

1. Diaper rash cream.

2. Cradle cap.

3. Circumcision healing.

4. Breastfeeding salve.

Miscellaneous Coconut Oil Uses

1. Massage oil.

2. Personal lubricant.

3. Shoe polish.

4. Unsticks fabric in zippers.

5. Unsticks gum.

Conclusion
Virgin coconut oil is an awesome product that everyone ought to keep around the house! If you want to learn more about coconut oil uses and cures, you can browse the rest of the Coconut Oil Tips site. I also highly recommend you check out the book The Coconut Oil Miracle by Bruce Fife.

There are several good brands of coconut oil — Just always make sure you choose well: It must be unrefined (also called “virgin”) coconut oil, ideally that has been cold-pressed and is stored in a nontoxic container.

46 Ways to Use Coconut Oil ... Yes, 46!!!!

Coconut Oil has really come on my radar this year. Here is a poster from The Coconut Oil Tips Web Site.

Tuesday, April 23, 2013

All Natural Ways to Control Slugs


Tom hates always giving up his beer to battle slugs …. Just kidding!! … Here are eight ways to stop those little critters in their tracks.

All Natural Ways To Control Slugs from The Funtime Guide.

1. Beer: Those pesky slugs hold their alcohol like a 12-year-old girl. Ideal Bite has some clever thoughts on using beer traps for natural slug control… including the “one for you, one for me” approach. Ha!
2. Egg Shells: Mother Earth News recommends crushing up egg shells and sprinkling them around your plants. Obviously the egg shells will also benefit the soil as they decompose… so they provide double the benefit.

3. Diatomaceous Earth: Diatoma what? Diatomaceous earth is basically the natural fossilized remains of diatoms, a type of hard-shelled algae. Just as with egg shells, soft-bodied pests (like slugs and snails) will not crawl over it… for the same reason humans won’t walk on broken glass.

4. Sandpaper: Just as with egg shells and diatomaceous earth, rough sandpaper is too painful for the slugs to cross.

5. Citrus Rinds: Planet Green recommends using upside down halves of grapefruit rinds as a slug traps. Set them out at night and you’ll have slugs up inside them in the morning. Personally i’m not a big fan of the trapping techniques as I don’t really want to have to see and dispose of the slugs… they disgust me. Blah!

6. Seaweed: EarthEasy.com says, “If you have access to seaweed, it’s well worth the effort to gather. Seaweed is not only a good soil amendment for the garden, it’s a natural repellent for slugs. Mulch with seaweed around the base of plants or perimeter of bed. Pile it on 3″ to 4″ thick – when it dries it will shrink to just an inch or so deep. Seaweed is salty and slugs avoid salt. Push the seaweed away from plant stems so it’s not in direct contact. During hot weather, seaweed will dry and become very rough which also deters the slugs.” Be sure to check out EarthEasy’s list of natural slug repellents. You’ll find some of the same and some different methods than what we’re talking about here.

7. Organic Baits: The Weekend Gardner web magazine recommends using either Sluggo or Escar-Go. How do they work? Iron phosphate. Weekend Gardner says, “Iron phosphate is an organic compound that is found naturally in the soil, and if the bait is not consumed by a slug or snail, the material breaks down into fertilizer for your soil. Iron phosphate is not volatile, and does not readily dissolve in water, which minimizes its dispersal beyond where it is applied.”

8.Companion Planting: I didn’t know about companion planting when we planted our garden, but I’ll definitely be using it next year. Basically, certain plants planted near each other benefit each other and may also deter certain pests. Plants that deter slugs are: wormwood, rue, fennel, anise, and rosemary.

Monday, April 22, 2013

Home=Made Non-Toxic Weed Killer

Image from Scott Astle's Blog
We feed our cows grass clippings from time to time so we can't use weed killer or other chemicals on our lawn.  This year I am going to try this Non-Toxic Weed Killer from Scott Astle.  This would be a great formula for people with kids and pets too.


NON-TOXIC WEED KILLER

1/2 gallon of Apple Cider Vinegar
1/4 c table salt
1/2 tsp Dawn liquid dish soap 

Mix above ingredients in a spray bottle.
Spray weeds thoroughly.

1/2 gallon for around $6.40
Works better than Round Up - kills weeds on 1st application.

The Dawn dish soap strips the weed of its protective oils so the vinegar can work with deadly force. Safe to use a yard used by pets.

Sunday, April 14, 2013

Home-Made Flea and Tick Treament for Your Pets

Here is a safe home-made flea and tick treatment for your pets from Annie's Homestead-The Holistic Homestead and Primal Rights.

Image from www.packerlandvet.com

Flea & Tick Remedy

8 oz apple cider vinegar
4 oz warm water
1/2 tsp salt
1/2 tsp baking soda

Mix dry ingredients first then slowly add to wet as the vinegar and baking soda will react slightly. Put into spray bottle and spray pets down. Be careful not to get in pets eyes.

Use Borax throughout the house, sprinkle it on the carpets and let sit for a few hours, then vacuum. This should kill all the fleas and ticks in your home and on your pets.

* It is safe for any animal, apple cider vinegar has a shelf life of about 3-5 years so I would assume you'd be fine to store it for a long time, just keep it out of direct sunlight and it shouldn't spoil. As for application, if your pet if flea and tick free then once a week, or after every bath. If they're infested, spray every couple days until infestation is gone, then do maintenance spraying of once a week or after every bath.

* Borax on animals: I wouldn't put borax directly on the animals, it might irritate their skin, but use on the floor is perfectly fine. I've used this combo in the past when I had dogs and cats that were indoor/outdoor. Works great! Also cedar chips in and around pet beds works to repel fleas and ticks.


Friday, April 12, 2013

Homemade Mosquito Trap

Just saw this on the Homesteading/Survivalism Blog. Maybe with the natural mosquito repellent recipe from yesterday and this tip on how to make a natural mosquito trap, I will be able to SURVIVE the summer!!

Image from the Homesteading/Survivalism Blog

 
Modern technology has brought us many benefits, including mosquito traps that cost hundreds of dollars, but sometimes we overlook simple solutions to difficult challenges such as mosquito control. When it comes to controlling pests, research tends to focus on chemicals or concepts that can be patented. Unless someone can make a profit from an idea, the public may never become aware of it.

HOMEMADE MOSQUITO TRAP

ITEMS NEEDED:

200 ml water
50 grams of brown sugar
1 gram of yeast
2-liter plastic bottle

Or US conversion:
1 cup of water
1/4 cup of brown sugar
1/4 tsp of yeast

HOW:

1. Cut the plastic bottle in half.
2. Mix brown sugar with hot water. Let cool. When cold, pour in the bottom half of the bottle.
3. Add the yeast. No need to mix. It creates carbon dioxide, which attracts mosquitoes.
4. Place the funnel part, upside down, into the other half of the bottle, taping them together if desired.
5. Wrap the bottle with something black, leaving the top uncovered, and place it outside in an area away from your normal gathering area. (Mosquitoes are also drawn to the color black.)

Change the solution every 2 weeks for continuous control.


Tuesday, March 26, 2013

Naturally Dyed Eggs with Full Instructions

Since Easter is coming up in less than a week, I thought I would post this great idea from Deb Thompson and the Just Short of Crazy Blog.

Natural Dyed Eggs-51
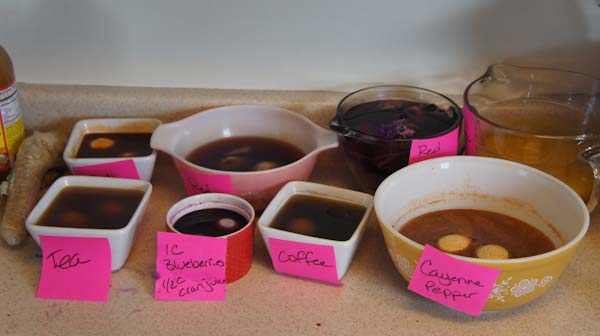
I decided to try my hand at making Easter Eggs using only natural ingredients this year. I pulled food and spices out of the cabinet and fridge and got busy trying different things to see what works and what doesn’t.
I remember my mom and grandma using red onion skins to dye eggs when I was child, but I don’t remember how they dyed the eggs using them. A little research and I had an idea of how to go about dyeing the eggs using natural ingredients.
I used the following items to dye eggs:
Coffee
Tea
Red Onion
Red Cabbage
Turmeric
Yellow Onion
Blueberry + Cranberry Juice
Blueberry
Chili Powder
Cayenne Pepper

natural dyed eggs
 
Alan is quite the trooper. He came home and saw my little experiment going on in the kitchen and just took it in stride. These bowls took up about 75% of my counter space so nothing else would be happening in the kitchen (ie: cooking dinner) until the experiment was over. The items that you see at the far left of the image are some of the ingredients for my super tonic that I’ll be sharing with you soon.

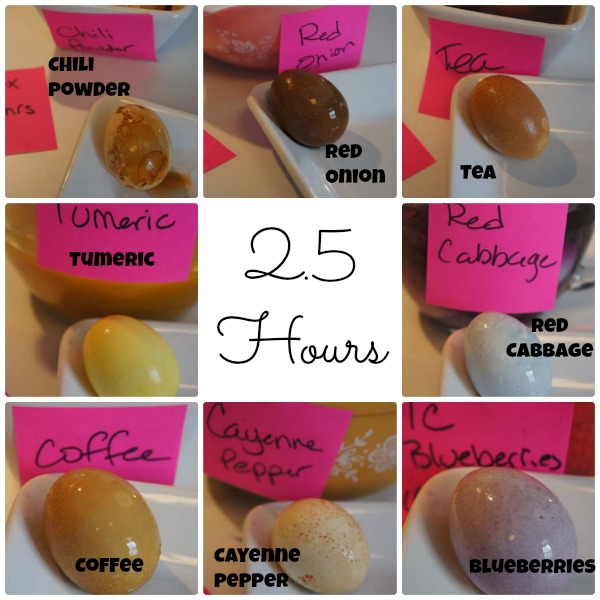
I left the eggs in the solution for 2.5 hours, 5 hours, and 9 hours just to see what kind of colors occurred over long periods.

2.5 hour titles

At 2.5 hours some of the eggs could have been considered done, but I wanted to see the results from leaving them in longer.

At five hours the red cabbage eggs are turning a beautiful color blue.

5 hour titles

Nine hours was too long. I could have been done at 2.5, perhaps sooner, for most of the eggs and 5 hours for the turmeric and red cabbage.

9 hours title

Some of the eggs could have come out of the solution right away and some others needed the full 9 hours. I’m sharing the “how to” for each egg below.

Here are the eggs after 9 hours in the liquid and air drying. The only exception is the two different blueberry eggs in the chart. The one in the upper right corner is blueberry and cranberry juice after nine hours and the eggs in the lower left is eggs just rolled in blueberry juice and removed immediately. The yellow onion was also only left in for a couple hours. I done those two sets of eggs the next day so didn’t include them in the 9 hour experiment.

Egg Titles


NATURAL DYED EASTER EGGS INSTRUCTIONS

I used two different methods to make these eggs; a cold method and a hot method.

For the majority of these eggs I used the cold method. Just mix the ingredients in a non-staining bowl (ie: glass is great) and add hard boiled eggs. Let them sit until the desired color is achieved.

For the hot method I added the ingredients and raw eggs to a non-aluminum pan, brought the mixture to a boil, reduced the heat and let simmer for 15 minutes. Remove from heat and let sit until eggs achieve the desired color.

The method used is noted in the directions below.

NOTE: The eggs may take on the flavor of the coloring agent.

Natural Dyed Eggs-17

YELLOW ONION SKINS: 1 cup of water, room temp + dry peel from one medium yellow onion + 1/8 cup of white vinegar (cold method). This combination will color one egg. Instead of throwing dry onion skins away during the year you can save them to color Easter eggs in the Spring. (The little dash of blue you see on the left side of the egg is from a rogue blueberry that ended up in the pan.

Natural Dyed Eggs-5

TEA: 3 tea bags+1 cup steaming hot water+1/8 cup of white vinegar (cold method). Steep the tea bags to make very strong tea. Add eggs and let sit in water until desired color is achieved.

Natural Dyed Eggs-16

BLUEBERRIES: 1/2 cup frozen blueberries (thawed & smashed) + 2 Tablespoons white vinegar (cold method). Roll eggs until color is achieved and then remove. These took just a couple minutes to make.

Natural Dyed Eggs-15

RED ONION SKINS: 1 Cup water + dry peel from 1 large red onion + 1/8 cup white vinegar (hot method). This combination colored 2 eggs. As with the yellow onion skins, red onion skins can be saved throughout the year as well.

Natural Dyed Eggs-14

TURMERIC: 2 cups warm water+ 3 tablespoons turmeric + 1/8 cup white vinegar (cold method). This ended up being one of my favorite colors. The turmeric creates a beautiful yellow color that reminds me of spring. The darker areas are where the egg sat on undissolved turmeric.

Natural Dyed Eggs-13

CAYENNE PEPPER: 2 cups warm water + 3 tablespoons cayenne pepper + 1/8 cup white vinegar (cold method). The speckles are created from the undissolved cayenne pepper.

Natural Dyed Eggs-12

RED CABBAGE: 1/2 of red cabbage head, chopped up + 1/8 cup white vinegar + 4 eggs + enough water to cover eggs (hot method). I love, love, love this color. The egg with white speckles/lines was created by wrapping an egg in a cabbage leaf and securing with a rubber band and then adding to pan with the other ingredients.

Natural Dyed Eggs


Natural Dyed Eggs-7

BLUEBERRY/CRANBERRY JUICE: 1 cup frozen blueberries, thawed and smashed, 1/2 cup 100% cranberry juice + 1/8 cup white vinegar (cold method). I’m not sure how much impact the cranberry juice had on the color but I needed some liquid for the eggs to sit in and I didn’t want to dilute it with water so I used some cranberry juice. 9 hours was too long, in my opinion, for these eggs. I thought they were perfect around 2.5 hours for a light spring color.

Natural Dyed Eggs-6

CHILI POWDER: 2 cups warm water + 3 tablespoons chili powder + 1/8 cup white vinegar (cold method). Eh, wouldn’t make these again. The color reminded me a lot of brown eggs.

Natural Dyed Eggs-4

COFFEE: 1 cup of very strong brewed coffee + 1/8 cup white vinegar (cold method). This egg was a little darker, but I wiped the egg off after taking it out of the liquid and ended up with this light tan color.

SAFETY NOTE:

Thanks to reader Charity Woods for bringing up the safety issue of consuming eggs that have sat out. I neglected to mention this in my post so please be advised of the following: “Do not eat hard boiled eggs that have been left out for more than 2 hours. Refrigerate hard boiled eggs within 2 hours 45degrees or less, eat within 1 week! Raw eggs can only be left out for 2 hours or less also. We don’t want people out there getting sick.”

Friday, March 22, 2013

Homemade Antiseptic Mouthwash

All images from the Frugally Sustainable Blog

Here is another great article from the Frugally Sustainable Blog.

By now you all should know that I love to make my own natural health, home, and beauty products. I love them because they work and I love them because they’re frugal. So when I was using my fancy-pants “eco friendly, 100% natural” mouthwash the other day, I thought to myself, “I think I could make this and save myself some money!”

Benefits of Using Homemade Mouthwash
Good oral care is vital to our health and vice versa. Health and diet have even been know to  heal cavities! Rinsing out the mouth with a cleansing mouthwash is a large part of good oral hygiene. And there are many benefits to making your own:

  • It’s cheap. You can create your own mouthwash at a fraction of the cost of store-bought and still experience excellent results.


  • You control the ingredients. Making your own mouthwash allows you to control the quality of that which you put into your mouth


  • No hidden chemicals. Commercially-prepared products are often heavy-laden with additives such as preservatives, dyes, artifical sweeteners and a multitude of harmful chemicals. Eliminate them all by making your own!


  • Variety of Homemade Mouthwash Recipes
    There are a variety of different recipes to meet the needs of every individual. Here are just a few:

    Basic Mouthwash: 1 cup water, 1 teaspoon baking soda, and 3 drops peppermint essential oils. Mix all ingredients in a glass jar and shake well. Swish in mouth, then spit out. Store on bathroom counter.

    Old-Fashioned Disinfectant Mouthwash: 1 cup water and 2 tablespoons apple cider vinegar. Combine ingredients and store in a glass jar. Shake well prior to use. Swish mixture in mouth, then spit out. Will keep indefinitely on the counter.

    Hydrogen Peroxide Mouthwash: 1 part hydrogen peroxide mixed with 1 part water. Swish mouthwash in mouth, then spit out. Mix enough for single use and discard extra solution.

    Lemon Whitening Mouthwash: Not really a mouthwash, but you can rub a piece of lemon on stained teeth for a whitening effect.

    Herbal Mouthwash: Create an herbal infusion by steeping 2 cups of boiling water, 1/2 ounce of whole cloves, 1 ounce of Oregon grape root, and 1 ounce of rosemary in a pint-sized glass mason jar, overnight. In the morning strain the infusion using a piece of cheesecloth. Swish in mouth, the spit out. Store in a glass jar in the refrigerator. Will keep for 1 week.

    Simple Essential Oil Mouthwash: To 1 cup of water add 20 drops of either cinnamon, clove, wintergreen, or tea tree oil. Combine all ingredients in a glass jar. Shake well prior to each use in order to distribute the essential oils. Will keep on the bathroom counter indefinitely.

    Antiseptic Homemade Mouthwash


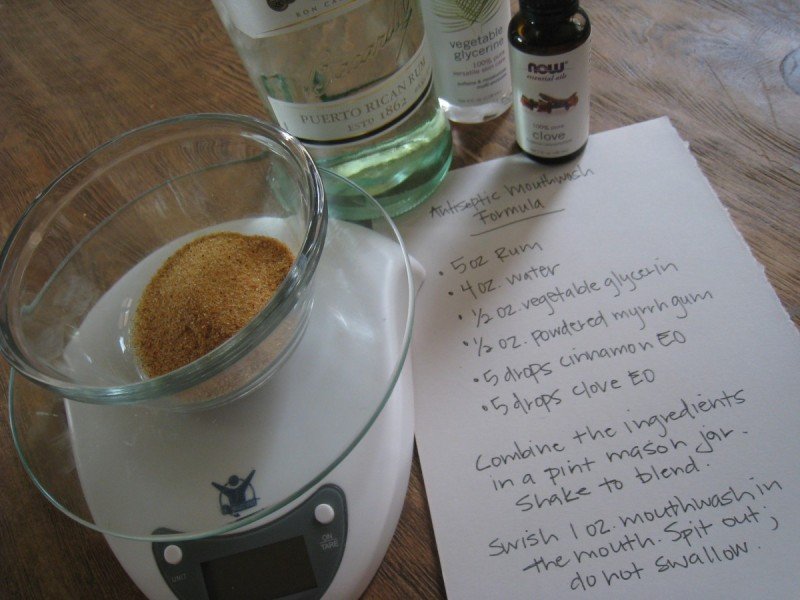
    Gather the ingredients:
    -5 ounces Rum or Vodka
    -4 ounces water
    -1/2 ounce vegetable glycerin
    -1/2 ounce powdered myrrh gum
    -5 drops essential oils of cinnamon
    -5 drops essential oils of clove

    Directions:
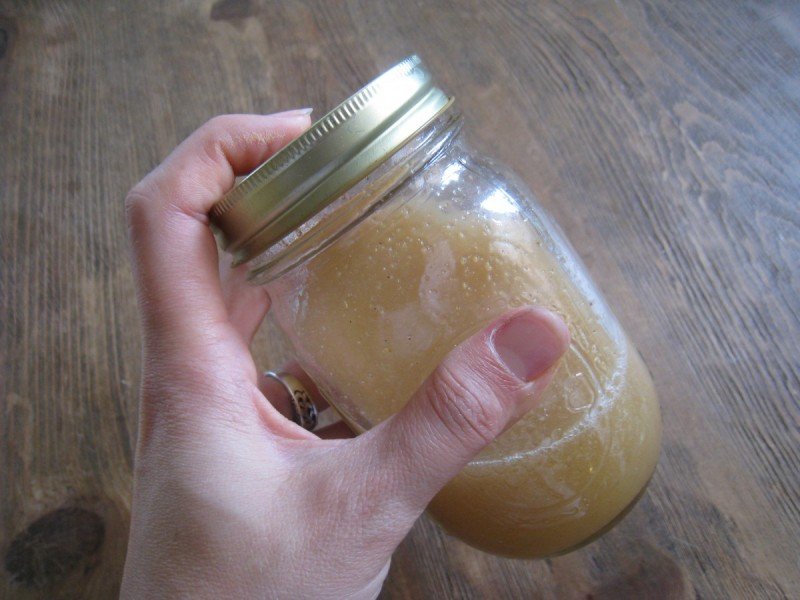
    Combine all ingredients in a pint-sized glass mason jar.

    Shake well to blend.


    To use:
    I do not recommend that you use this mouthwash daily — due to the alcohol content of this mixture, it can have a drying effect. Use of this solution may be better limited to times when a more antiseptic oral cleanse is desired. Shake well prior to use. Swish in mouth, then spit out. Will store in glass jar on bathroom counter indefinitely.

    Notes
    Myrrh gum has broad-spectrum antiseptic properties. It is also well known as an anti-inflammatory — excellent for use in treatment of oral ailments…namely gum disease.

    Cinnamon contains many antimicrobial properties as well. It also functions as a natural preservative.

    Essential oils of Clove can be used to heal and prevent cavities. It relieves the pain of a toothache. And it can also act to decrease oral infections because of its antiseptic properties.

    Rum and Vodka kill bacteria and freshen breath.

    Most of the ingredients can be found over-the-counter at a pharmacy. You can purchase powdered myrrh gum and the essential oils from Mountain Rose Herbs or The Bulk Herb Store.

    What does your natural oral care routine look like? Please share it with us.

    Please note: These are my own opinions derived from my own research. The statements made here have not been approved by the Food and Drug Administration or the American Dental Association. They are not intended to diagnose, treat or cure or prevent any disease.


    Thursday, March 21, 2013

    Homemade Mosquito Repellant

    Image from SurvivingTheStore.com
    I am REALLY going to try out this natural recipe!  Because I am sooooooooo sweet (wink), I am a total mosquito magnet.  I hope this works ... it would awesome to be able to sit out at night looking at the stars with my hubby and not feel like a human buffet for the bugs!! You can find this article on the Homesteading/Survivalism FB page.
     
    Combine in a 16 oz bottle:
    15 drops lavender oil [http://amzn.to/WOhOP8]
    3-4 Tbsp of vanilla extract
    10 drops of citronella oil [http://amzn.to/ZOLfyc]
    1/4 Cup lemon juice.

    Fill bottle with water. 
    Shake and it's ready to use.
    Spray on yourself.

    (You can also use 10 drops of lemon eucalyptus oil instead of citronella oil [http://amzn.to/ZfYPbx])

    Make some extra to gift to your neighbors, family & friends. Share this on your wall so you'll have it handy when it's needed.

    Note: If you don't already have the oils mentioned above, the links provided are available for you to order them online.
     
    P.S. I actually learned this little bit of trivia in a Trivia Game.  Mosquitos are attracted to people who eat bananas.  Guess what is off my food list in the summer!!!


    Meals in Jars plus Recipes

    I saw this article on the Frugally Sustainable FB page. Even though she is concerned about food prices and shortages, I think these ideas would be terrific for camping trips and quicky dinners, too!

    Meals in Jars

    When I see news headlines like these…

    U.S. Drought Driving Up Already Rising Food Prices While Economy Collapses! Get Prepared!
    Drought means beef prices could rise
    Multi-Billion Dollar Drought to Drive Beef Prices Up

    …my first reaction is to freak out! It’s natural to experience feelings of fear and/or anxiety when reading news stories like this, right? But why, why would I waste one second of my life worrying about something I have no control over? You know what eases my fear: knowledge, preparedness, and a community of people that I trust.

    About six months ago we began storing food. Buckets and buckets of organic beans, rice, quinoa, millet, oatmeal, popcorn, etc. now fill the once empty spaces of our closets. Given the access to water, we would be able to feed our immediate family and my parents (maybe even help out the neighbors) for about half a year. However, my thoughts lately are turning toward the possibility of using this food in the event prices of commodities were to increase, even more than they already have.

    I’ve also been trying to organize what we do have and make it more practical for use. Today I began working on “meals in jars.” By combining beans, grains, dehydrated veggies/fruit from the garden, and seasonings I am attempting to ensure that we will have a supply of tasty and nutritious meals in the case of an emergency. Not to mention, it’s been a fun activity for the kids and I. It’s like canning beans and grains, but instead of using the pressure cooker all we do is place an oxygen absorber in the jar (smile).

    There are thousands of different recipes you could follow when creating your meals in jars. Just remember to combine items that take approximately the same amount of time to cook. For example, do not intermix pasta with navy beans. The pasta will cook much quicker than the beans.
    For an abundance of recipes to use as a foundation for your meals in jars look on this forum. Below I have also provided you with a few of the recipes we put together today.

    Apple Cinnamon Oatmeal (1 pint jar)
    -1 cup oatmeal
    -1 tsp cinnamon
    -1/4 cup sliced almonds
    -1/4 cup dehydrated apples
    *2 cups water necessary to reconsitute

    Vegetable Millet (1 pint jar)
    -1 cup millet
    -1/4 cup dehydrated mixed veggies
    -1/4 cup dried parsley
    -1 tsp dehydrated minced garlic
    -1 tsp salt
    *3 cups of water necessary to reconsitute

    Quinoa and Lentil Soup (1 quart jar)
    -1 ½ cup quinoa
    -1 ½ cup red lentils
    -1/2 cup dehydrated veggies
    -1/4 cup dehydrated onion
    -1 tsp minced garlic
    -1 tsp salt
    -2 bay leaves
    *5 cups of water necessary to reconsitute

    Lemon Dill Rice (1 pint jar)
    -1 cup rice
    -1/2 tsp dried dill
    -1 ½ tsp dehydrated lemon peel
    -1/2 tsp salt
    *2 cups of water necessary to reconsitute

    For each recipe, layer ingredients in order as listed. Use the size jar as indicated. Place an oxygen absorber on top and then close lid. Store jars in a safe place. Keep off shelves.

    Storage Tips

    -The best way to store beans, grains, and dehydrated veggies/fruit is in a sealed mylar bag along with oxygen absorbers. The individual meals could then be stored in a 5-gallon bucket. Lightweight, takes up less space, it’s just a much better option. So, I’ll continue saving for the supplies required for this system of storage.

    I recommend purchasing mylar bags, oxygen absorbers, and heat sealers from the fine folks over at Preparing Wisely and SorbentSystems.com who sell Made-in-America products.

    The Ant Solution

    Image from Wesley Jueckstock
    This is a recipe for getting rid of those pesky ants that come every spring and summer. Mix up the solution, pack cotton balls in a jar, cover, put the solution into the jar and place in the area of the infestation. 

    Caution: Because boric acid is not pet friendly, the best container would be a small jar or plastic container with a lid in which you have punched some holes.

     Ingredients:
    1 cup sugar
    3 tablespoons boric acid
    3 cups warm water

    Directions:
    1. Mix the sugar and boric acid well.
     

    2. Add the warm water slowly, mixing all the while so it won't be too lumpy.
     

    3. Store in a jar until ready to use.
     

    4. When ready to use, put cotton into the top of a jar lid to fill it and then saturate the cotton to the top.
     

    5. Place it in the location where it is needed.
     

    6. Note: This solution will keep for a long while. A good technique is to drip a drop or two over the edge of the lid to rest on the counter so the ants will find the solution sooner. It sometimes takes a little while for them to find it, but find it they will. When they do, do not disturb them as they drink. They will hang over the edge of the lid and drink for a while and then take it back to the nest killing the colony. Almost overnight they will be gone.

    Monday, March 4, 2013

    How Apple Cider Vinegar Helps Your Body

    I know it sounds disgusting, but a few teaspoons of Apple Cider Vinegar can really be helpful to you and your body!  Patricia Bragg suggests 1-2 teaspoons of vinegar diluted with 8 ounces of water with each meal.

    Here are 10 reasons given by LiveFit Revolution for adding Apple Cider Vinegar (ACV) to your diet.

    1. It is enormously helpful to your digestive system. The enzymes in the ACV help your body to break down the food you eat, which helps you get more nutrients out of it;
    2. It helps your body eliminate, so if you’ve had problems with constipation, or even just a “slow system”, the ACV will help you have bowel movements more frequently and easily;
    3. Full and frequent bowel movements also help our body detoxify, and the more we detox, the more weight our bodies will allow us to lose, and they’ll do it more quickly! We store toxins in our body fat, and our ability to burn fat will slow down if the body can’t eliminate the toxins quickly enough to keep a healthy balance. So ACV aids in weight loss;
    4. ACV kills sugar cravings. If your body (or your brain!) is screaming for something sugary, an ACV drink will usually kill that craving;
    5. It helps keep your blood sugars balanced, which means an increased ability to lose weight AND less simple-carb cravings. WebMD.com mentions studies that support the claim that ACV can help in this way with Diabetes;
    6. One study found that obese people who consumed acetic acid (ACV) daily for 12 weeks experienced significant decreases in body weight, abdominal fat, waist circumference, and triglycerides;*
    7. Triglycerides are a mechanism for storing unused calories, and their high concentration in blood correlates with the consumption of starchy and other high carbohydrate foods (Wikipedia). As ACV is said to reduce triglycerides, this means a reduction in our ability to store unused calories;
    8. ACV is an acidic substance (more on this below), but when you ingest it, it becomes an alkalizer, which means it balances body pH by making you more alkaline. Research has shown that an alkaline diet fights cancer;
    9. It supports healthy regeneration in your body. The evidence of this comes after a few months, when you’ll notice your hair and nails are both longer and a lot stronger. You’ll notice your skin looks even better too;
    10. ACV is also said to reduce our “bad” (LDL) cholesterol.
    “BUT I DON’T LIKE THE TASTE”
    Some of us like ACV right away. Some of us find the flavor a challenge. As children, most of us didn’t like certain vegetables when we first tried them either, but sometimes it’s worth persevering for the sake of our health.
    You can add a few drops of Stevia to your ACV; diluting it with more water can make it more palatable too. If you have a strong reaction to it (like an overly-active digestive system, too-soft stools, or nausea – especially when you drink it first thing in the morning), you might try cutting it down to one or two TEAspoons of ACV in 8oz water, and build up your tolerance. You can also add ground flax to your drink; the nuttiness of the flax goes well with the sharp apple flavor of the ACV.
    Most people find that in a short time, they feel so good that they start to look forward to their ACV drinks, and develop a taste for it!
    ACIDITY
    ACV has a pH of 4.25 to 5.0 when it is undiluted. Since tap water usually has a pH of approximately 7.6, when you put a couple of tablespoons of ACV into 8oz water, it will be MUCH less acidic. It’s interesting to note that the ph of Coca Cola is 2.5, and 7-Up is 3.2, and since soda is consumed undiluted, it is FAR worse for your teeth than ACV could ever be.**
    CAUTIONS
    If you have sensitive teeth or are concerned about your enamel, you should consult your dentist. Some people choose to swish their mouth with a sip of plain water after drinking their ACV.
    Also, ACV is high in Potassium, so if you take drugs such as Coumadin/Warfarin (for preventing blood clots) you should not take ACV.
    And finally, people with some forms of inflammatory bowel disease (such as Crohn’s disease) should not take ACV. So if you do have health issues, you should consult your Doctor before adding ACV to your personal nutrition plan.
    *  Published in Bioscience, Biotechnology, and Biochemistry in 2009; full article here
    **Softpedia.com – read their article on the acidity of soft drinks here

    Tuesday, February 26, 2013

    What are Adaptogens and Why Do You Need Them?


    When I talk about my Isagenix products I point out that our Ionix Supreme and now our new e+ Natural Energy Shot contain adaptogens. Often I am asked, "What are adaptogens?"  The word adaptogen is used by herbalists to refer to a natural herb product that increases the body's resistance to stresses such as trauma, anxiety and bodily fatigue.  In the past they have been called rejuvenating herbs, qi tonics, rasayanas, or restoratives.  Knowledge about adaptogens dates back thousands of years to ancient India and China, but serious scientific study did not begin until the late 1940s. 

    In 1947, Dr. Nikolai Lazarev defined an adaptogen as an agent that allows the body to counter adverse physical, chemical, or biological stressors by raising nonspecific resistance toward such stress, thus allowing the organism to "adapt" to the stressful circumstances.  In short, adaptogens are plant and herbal extracts that help the body to "adapt" and normalize, creating an overall sense of well-being and balance.

    In other words ... If you or your body are stressed
    YOU NEED ADAPTOGENS!


    Friday, December 14, 2012

    Making Your Own Home-Made Coconut Oil Deodorant

    It is no "secret" (get it???) that I love Trader Joe's Organic Virgin Coconut Oil for a great moisturizing body cream ... well add to my list ... Home-Made Organic Virgin Coconut Oil Deodorant!!  Here are the recipes!!
    Recipe 1- What You Need:
    3 T Coconut Oil
    3 T Baking Soda
    2 T Shea Butter
    2 T Arrowroot (optional)
    Essential Oils (optional)
    What to do:
    Melt shea butter and coconut oil in a double boiler over medium heat until barely melted. UPDATE: Combine in a quart size glass mason jar with a lid instead and place this in a small saucepan of water until melted. This will save your bowl and you can just designate this jar for these type of projects and not even need to wash it out…
    Remove from heat and add baking soda and arrowroot (If you don’t have arrowroot, use more baking soda)
    Mix well
    Add essential oils and pour into a glass container for storage. It does not need to be stored in the fridge.
    If you prefer, you can let it cool completely and put into an old deodorant stick for easier use, though it may melt in the summer!
    If you don’t have all those ingredients around, or don’t want to wash a double boiler, this recipe is faster and easier:
    Recipe 2- What you Need
    6 T coconut oil
    1/4 cup (4 T) baking soda
    1/4 cup (4 T) arrowroot or cornstarch
    essential oils (optional)
    What to Do:
    Mix baking soda and arrowroot together in a medium sized bowl.
    Mash in coconut oil with a fork until well mixed.
    Add oils if desired.
    Store in small glass jar or old deodorant container for easy use.
    Why Use Natural Deodorant?
    I started this pursuit to avoid the alzheimers and breast cancer, but I’m a lifelong convert because it works! No, really! I was the girl who rejoiced when Secret Clinical Strength came out before prom one year. I’ve had to use regular deo a few times since I started the natural, and it doesn’t work as well. Although not an antiperspirant,  it does seem to absorb a lot of wetness.
    After a few weeks of using natural, I noticed an unexpected side effect… I wasn’t sweating as much to begin with. Months later, and I notice this even more!
    I urge you to try making your own deodorant. Even if you aren’t daunted by the ingredients in your own deo, wouldn’t you feel better knowing you weren’t putting anything on your skin that you couldn’t eat (not that

    Wednesday, November 28, 2012

    University Study Finds Isagenix Superior to Leading “Heart Healthy” Diet

    September 20, 2012 IsagenixHealth.net
    Dr. Krista Varaday
    University of Illinois
    Chicago College of Applied Sciences

    Dr. Krista Varady discusses clinical research on Isagenix products.
    The highly anticipated results are in—Isagenix products are superior to a leading “heart healthy” dietary plan for weight loss and visceral fat loss. The manuscript has been submitted to two peer-reviewed journals and is still under review; however, you can read more details about the study on our clinical research summary and marketing flyer.
    Krista Varady, Ph.D., the lead investigator of the study, is a prolific researcher at the University of Illinois at Chicago’s College of Applied Sciences with more than 30 peer-reviewed research publications. She has a Ph.D. in nutrition from McGill University—one of the top universities in Canada. Dr. Varady has devoted much of her time to investigating the ability of weight-management strategies to decrease cardiovascular disease risk and is one of the pioneers in research on alternate-day and intermittent fasting.
    Dr. Varady’s research was presented in August at the 10th annual Isagenix Celebration in Phoenix. Eager to share the exciting results, Dr. Varady answered questions from Isagenix Chief Science Officer Suk Cho, Ph.D.:
    Q: What did you think when you tried Isagenix?
    A: I always try things before I make my subjects do it. I used Isagenix for three weeks in January before we began the study. I didn’t want to lose a ton of weight, but I did want to see if I could lose a few pounds with it. The easy of use was great—no dishes at breakfast or lunch; you didn’t even need to have milk at home. I went out and bought a few shake products to compare it to and I’m not sure what you guys do, but the consistency is like a smoothie. The other shakes were clumpy and it made them less appealing.
    Q: What else impressed you about Isagenix products?
    A: I was impressed by the Cleanse Day and the high-protein IsaLean® Shake. All the ingredients actually seemed wholesome. I had thought the shake would be a high-sugar beverage, but I found it to be really nutritionally complete.
    Q: What attracted you to collaborate with Isagenix on research using their products?
    A:  The main thing was that Isagenix incorporates fasting while on Cleanse Days. I find that really novel. If you look at other meal-replacement diets, they never really incorporate fasting or cleansing. Usually it is a shake for breakfast and a shake for lunch, but they don’t use all the other products Isagenix uses. I like that it is a multifaceted approach. You are also using supplements that may provide metabolic benefit and protect against free radicals—I thought that was really neat too, but the main thing was that there was a Cleanse Day every week because I am really interested in fasting research.
    Q: What can you tell us about the study’s results?
    A: Our main finding was that weight loss was actually greater in the Isagenix group. On average they lost 3.9 kg, so that works out to be around 9 pounds or so. Obviously, some lost more and some less, but the Isagenix group lost 3 pounds more on average than the other diet. We also saw those changes with fat mass. With Isagenix, we saw slightly greater reductions (although not significant) in fat mass. Neither group lost a significant amount of lean mass, which is great because you want to maintain your muscle mass to keep your metabolic rate higher and that allows you to burn more calories per hour.
    Q: What are the results for visceral fat (fat that surrounds the organs)?
    A: Even though it wasn’t statistically significant between groups, we found that there was a much greater reduction in visceral fat in the Isagenix group—about twice as much. They lost 0.7 kg, about 2 pounds. I find that amazing—they lost 2 pounds around their organs—that’s a lot!
    Q: What other part of this study’s results do you find most exciting or intriguing?
    A: What I found most intriguing at first was the adherence of the Isagenix group; they seemed to adhere better because of the convenience factor of the Isagenix system. Also, the Isagenix group lost more weight and more fat (especially visceral fat); and the blood chemistry looked wonderful.
    Q: What other personal observations have you made about the Isagenix products and how they affect subjects?
    A: Isagenix people just seemed happier. Also, the satiety (or fullness) aspect; people didn’t feel motivated to binge after a shake or cheat on the diet because they really did find those shakes quite filling, so I was pretty impressed with that. That is the main reason that I am even testing out these diets—to find diets that people will actually do and adhere to over the long term. They liked the taste of the shake and just in terms of the easiness too, they said small things like “there were less dishes to wash” and “for breakfast all you really have to do is keep the blender clean, there’s not that much prep involved and it is a portable system.” But those are actually really important things—if a diet is hard to do, people aren’t going to do it for very long. So making it easy, making it easy to clean up after—all those things add up for long term weight loss.
    Q: You had some products left over after the study and people asked you for them, right?
    A: Yeah, I had 3 boxes left of the shakes and I have never seen women diving in there, fighting with each other. They were all over each other. Those were gone pretty quickly after we opened them up!

    Saturday, October 27, 2012

    Why You Should Take an Epsom Salt Bath

    I was reading some cleansing tips and one of the suggestions was to take Epsom salt baths.  I had heard that Epsom salts were great for soaks when you sprain and ankle, but I began to wonder how they helped in the detoxing process.
    According to the Epsom Salt Council, Epsom salts contain sulfates and the sulfates help to flush toxins and heavy metals from the cells.  .
    Our skin is a very porous membrane.  If you add the right minerals to your bathwater, they trigger a process called reverse osmosis, which actually pulls salt out of your body, and harmful toxins along with it.
    But how does it work?  Imagine your body as a party with lots of people -- both those who were invited and those who weren't. When the party's over, usually at least some of those uninvited partygoers are still sticking around. It's late, and you're trying to figure out how to politely send them on their way. When you take an Epsom salt bath, those "uninvited" pollutants are told to leave your body. That message is delivered by none other than magnesium sulfate.
    A little more about Magnesium Sulfate:  Magnesium helps keep your bodily functions running smoothly, including some of the pathways that lead toxins right out of your body. Sulfate helps to strengthen the walls of your digestive tract so that it's easier to release toxins. As a compound, magnesium sulfate also raises the amount of digestive enzymes in the pancreas.
    Epsom Salt Baths: If you're ready for an Epsom salt bath, consider your tub size and water depth before you begin pouring in the salt. More salt isn't necessarily better. The Epsom Salt Council suggests that a common formula is to add a cup or two (about 0.25 or 0.5 liters) of Epsom salt to warm water in a standard-size bathtub. If your bathtub is bigger or smaller than most, you may want to adjust the amount of Epsom salt you add.
    The water you use in an Epsom salt bath -- and any bath, for that matter -- should be warm, not hot. Warm or tepid water is best for your skin because it doesn't strip away as much protective oil, and it helps to dissolve the Epsom salt. Before you climb into the bath, make sure that all of the salt has dissolved so that it can be more easily absorbed into your skin. Any salt that hasn't dissolved in the water may dry on your skin as an opaque white powder. If you see this residue on your skin after the bath, don't worry; excess salt should be harmless and is easily rinsed off.
    The Epsom Salt Council recommends soaking in an Epsom salt bath for about 15 minutes up to three times per week.
    Cautions and Contraindications: Despite the benefits, Epsom salt baths generally aren't recommended for people who have conditions such as heart problems, high blood pressure or diabetes. If you aren't sure whether an Epsom salt bath is safe for you, consult your doctor first.
     Epsom salt has been a cure-all for generations: It has been used to soothe aches and pains, and more recently for softening skin, preventing wrinkles and detoxifying your body.  As an example, soothing baths, Epsom salt baths can be incorporated into your beauty routine as a way to exfoliate, as an at-home facial when mixed with a cleansing cream and as bath crystals when mixed with a fragrance.
    Now … take some pamper time for yourself, draw a warm bath, swirl in some Epson salts, light some candles …. And relax!!